Cardstock – 5 ½” x 8 ½”, 3 ½” x 4 ¾”, 2 ¾” x 4”
DSP #1 4” x 5 ¼”
#2 3 ¼” x 4 ½”
#3 2 ½” x 3 ¾”
Score 5 ½’ x 8 ½” cardstock at 1 1/16”, 2 1/8”, 3 3/16” and 4 ¼”
This is what the back of my template looks like.
After you have scored the cardbase at all 4 spots, then fold your cardstock at the 4 1/4" score as you would a normal card.Then accordian fold the next 3 scorelines...back and forth from the initial fold.
Open cardbase with inside facing you and place on trimmer with 5 1/2" edge at top and scorelines toward the top. Place at the 4" mark on the left edge and cut from the first scoreline up. Move to the 4 3/4" mark and cut from the 3rd scoreline up.
Now with scissors, cut the tabs as follows: cut from the 4 1/4" fold to the 3rd scoreline, Then cut from the 2nd scoreline to the 1st. After you have done that, your template should look like the one to the right.
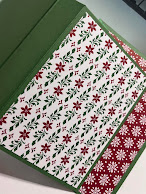
We're ready to assemble the card! Adhere the largest DSP to the inside of the card. Adhere the next largest DSP to the 3 1/2" x 4 3/4" piece of cardstock. Then adhere the smallest DSP to the smallest cardstock.
Adhere the middle matted DSP to the cardbase, snug up against the inside fold.
Then add the smallest matted DSP to the front fold, making sure the edges are even.
This is what the template looks like from the front!
Any sentiment or embellishments should fit on the front (smallest) DSP.
For a greeting inside, 2 3/4" x 2" will fit hidden behind the 2nd layer!
Once
you put this card together, it will be much easier the 2nd time! And it
is such a unique card. So give it a try. You can watch the YouTube video here or on my Facebook page
I show two other samples on the video so be sure to go take a look! Enjoy!


No comments:
Post a Comment