Thursday, March 12, 2026

Stash to Card - 4 Funfolds and Scenic DSP

 Today's Facebook Live showed 4 different funfolds that highlight the scenic DSP. I demonstrated the window card but promised to give the instructions for the other 3 here.

The first card is the easiest.                                                                                                                          The card base is 5 1/2" x 8 1/2" scored at 1 1/2" and 5 3/4". Cut 3/4" off bottom (or the top) of 6" x 6" DSP then cut the 6" x 5 1/4" DSP at 1 1/4" x 5 1/4" and 2 1/2" x 5 1/4". Adhere the small piece on the left flap and the larger on the right flap.  Cut Basic White or Very Vanilla at 5 1/4" x 4" for inside. Embellish as you want. 


The 2nd template is the 3 panel Funfold. For this one the card base is also 5 1/2" x 8 1/2", scored at 2 1/8 and 4 1/4. Again, cut 3/4" off the top or the bottom of the 6"x6" DSP, Cut the 6" x 5 1/4" at 1/7/8" two times starting from the left side, leaving a 2 1/4" x 5 1/4" piece. This piece goes on the right side. Cut Bsic White or Very Vanilla 5 1/4" x 1 3/4". You can add a sentiment to the front by adding a rectangle diecut from Basic White or Very Vanilla.       

 
The third funfold is a 2 flap 3 panel card with a belly band. 
You will need a circle die or punch for this card.  
The card base for this one is 11" x 5 1/2" scored at 1 1/4", 5 1/2" and 9 1/4".  You'll also need a 1" x 10" piece of this carstock for the belly band.
Cut 3/4" off the top or bottom of your DSP. Since the DSP is 6", I had to make an adjustment in the DSP cuts. I had a scrap of the same paper so I cut one of the 1" x 5 1/4"  pieces from the scrap and put it on the inside front flap. Then from the 6" DSP I cut one 1" x 5 1/4", one 1 1/2" x 5 1/4" and one 3 1/2" x 5 1/4".  The 1" piece goes on the smaller front flap. The 1 1/2" piece goes on the 2nd flap and the larger piece on the card front. 
You'll need a 4" x 5 1/4" piece Basic White for inside and a scrap for the diecut front piece.
 Fold the belly band to slip over the card and glue the ends. Stamp your diecut piece with your sentiment and adhere it over the glued piece of the belly band. Embellish as you want.
 
Last is the window card that I demonstrated in the video . You'll want to watch to do this really fun card. The cuts for this card are
cardbase   11" x 4 1/4" scored 1/2", 1", 4 1/2", 5" 5 1/2", 6", 6 1/2", 10", 10 1/2"
 
DSP cut 3/4" off top or bottom. Cut pieces in this order...3/8" x 4 1/4", 3 3/8" x 4 1/4", 3/8" x 4 1/4" . 
Basic White cut two 3 1/4" x 4", one for inside and the other for the back.
 
Tip: Glue 3 3/8" x 4 1/4" DSP onto front of cardbase BEFORE cutting circle. 
 
I hope that you enjoy these funfold cards and that you are using up that stash!! 


Thursday, August 21, 2025

Stand Alone Step funfold card

e

 Today we are going to make a stand alone card - one that can be displayed on their desk, by their bed, on their bookshelf or even on the windowsill! You can watch the video on YouTube or on my Facebook page. It's a really easy card to make!

This is the card I demonstrated on my Facebook Live.


The supplies that you need will be 

2 card stock pieces (I used Pecan Pie) 8 1/2" x 5 1/2" scored at 3", 6" & 7 1/4". The second piece is        8 1/2" x 3 1/2" scored at 4 1/4".                                                                                                                       Choose a DSP (I used Country Woods) and cut 2 pieces - 5 1/4" x 2 3/4" and 5 1/4" x 1".                       You will also need either Basic White or Very Vanilla, two pieces cut at 3" x 4 1/4".                            Then you'll need images for the front and sentiment(s). My background diecut piece is from Mixed Florals cut from Very Vanilla. The cross is from Faith Collection cut from Earth Toned Metallic DSP. The smaller stems and flower are all cut with dies from Gallery Blooms, also using Very Vanilla. The background piece was embossed with the Cross Hatch 3D embossing folder.  The sentiments are from the Faith Collection as well, stamped in Pecan Pie ink.

This card is very easy to put together so watch the video to get the details.  

I also showed three other samples that I made.

 This first one is made using the Beautiful Pumpkins dies. I cut the pumpkins from one of the scenic DSPs. I picked one with subtle colors. The stems and leaves are cut from the new Earth Toned Metallic DSP. The Designer Series Paper is Timeless Plaid and I embossed the Very Vanilla with the Pressed Flowers embossing folder. 

This one is made using the new Spooky Sweet DSP. The cardstock is Gray Granite and the Pretty in Pink is embossed with the Birchwood 3D embossing folder.

I made this one using a retired DSP because I like the flower! 


I hope you will give this great Stand Alone Step card a try. Let me know if you have any questions. Please follow my blog!!
Thank you!

Friday, July 25, 2025

Pleated Prism Funfold

This is a fun fold that I saw demonstrated by Susan Campfield and fell in love with! It takes some practice but the end result is so worth it! You can see the video demonstration on YouTube.

The supplies needed for this card are as follows:

card base - 11" x 4 1/4" scored at 5 1/2"

card front  - DSP 4" x 1", dark cardstock mat 4" x 4", light cardstock 3 7/8" x 3 7/8"

Inside - Dark cardstock (mat) 3 3/8" x 3 7/8" (cut 2), light cardstock 3 1/4" x 3 3/4" (cut 2) 

Pleated piece - 4" x 4" DSP, scored at 2"

Make pencil marks at 3/4", 1 1/2", 2 1/2", 3 1/4" at top and bottom. Score diagonally from 3/4" to 3 1/4", 1 1/2" to 2 1/2", then other direction 2 1/2" to 1 1/2", 3 1/4"  to 3/4". See diagram below.


Now it's time to fold. First fold the center (at the 2" score) in a Valley fold. Open and fold the next diagonal scoreline Mountain on both sides. Last, fold the outer score lines Valley on both sides. 

This takes some practice but be patient and burnish with a bone folder as you go.

Fold and arrange the folds for the whole piece until it looks like this.


Pleated Prism Fun Fold

 Adhere the 1st inside piece to the left side leaving only a small border. Adhere the pleated piece so that the centerpoint is just left of the card center. This should be up against the left side piece. Lay the pleated piece flat and adhere the right hand side. Then adhere the 2nd inside piece up against the pleated center piece. Carefully close, manipulating the folds until you get it like the photo. Close completely and burnish the center fold again. You may even need to trim an edge.

Here are some other samples.


Keep working with it until you are happy with it. Don't give up!!! The video can be seen here on YouTube.


Thank you for visiting my blog. Please click follow to the left and add your e-mail. I only post once a week so you won't be bombarded with e-mails! 


Thursday, July 10, 2025

Stand Alone Bay Window

 This beautiful Stand Alone Bay Window card will be so great to send to someone who wants to display the card as a reminder of your good wishes! You can see the YouTube video here.

Here are the cutting dimensions for both unmatted (embossed) and matted.


This first sample is matted DSP. Follow ** instructions 


This second sample is using embossed cardstock. The sample that I demonstrated also uses embossed cardstock and is pictured below. 


 Thank you for visiting my blog. Let me know if you have any questions. Be sure to click Follow on the left side.

Thursday, June 12, 2025

Faultline Technique

 I love easy cards that use different techniques. This technique is not new to cardmaking but I haven't done it in a long time. So I decided to resurrect it!

These two samples were made using this technique.


I'm making a set of three of these to give as a gift so I'm demonstrating the third one of this set - Faith, Hope & Love.  These sentiments are from the Unbounded Love stamp set. Watch the demonstration on YouTube or on my Facebook page to see the technique demonstrated.

The supplies used are: 

cardbase 8 1/2" x 5 1/2"; front mat 5 1/4" x 4"; DSP 3 7/8" square; 2 pieces (lighter and darker color)        3 7/8" x 2 3/4"; mat for inside 5 1/4" x4" and lighter piece for inside 5" x 3 3/4". You can use whatever embellishment you want. I used either a diecut image on the front of each card that coordinated with the DSP or one that I fussy cut from the DSP. 

I featured the Storybook Moments DSP, using coordinating cardstock for mats. 


For the card I demonstrated, I used Calypso Coral as my base. The torn papers are Boho Blue (recently retired) and Basic Beige and the 'barely visible' mat is Pecan Pie (recently retired). The inside mat is also Pecan Pie and the lighter piece is Basic Beige.  

 Thank you for visiting my blog. Please click 'Follow' and add your e-mail.  


Thursday, June 5, 2025

Window Card Fun Fold

 This window card allows you to feature your scenic DSP and allows your recipient to display the card standing up. 


Watch the video either on Facebook or on YouTube for a demonstration of how to make this.

Here are the supplies that you will need to make this card.

cardstock 11" x 4 1/4" scored at 1/2", 1", 4 1/2", 5", 5 1/2", 6", 6 1/2", 10" & 10 1/2"; an extra piece for any images you may want to cut

DSP  3 3/8" x 4 1/4";  3/8" x 4 1/4" (cut 2)

a lighter cardstock  3 1/4" x 4" (cut 2)

The key to this card is the fold. First you fold it in half. Unfold and from right to left fold M-V-V-M (mountain, valley, valley, mountain) and continue the same pattern again after the center fold. 

After you fold the base in half, then starting from right to left fold and score M-V-V-M then after the center fold use the same pattern again - M-V-V-M. Your base should look like the photo above.

Watch the video on YouTube to see how I cut my DSP to show a continuous scene. Your DSP cutting sizes are above.

Once you have adhered the DSP as shown, then you will need to cut your window using a circle die or punch. You'll then do your stamping on the lighter cardstock (3 1/4" x 4") and adhere to the inside. 

Now it's time to add Tear N Tape to the center and the edge to secure the card. 
 

Adhere the second piece of lighter cardstock to the back to create a space to sign the card.

Add any embellishments you want to the front and you are ready to bless someone with your beautiful Window Card! 

Here are the other samples that I showed, all using the Beautiful Gallery DSP.


Now it's your turn!

Thursday, May 15, 2025

Mystery Make It Together 5 /15/25

 Here are the supplies you need to create this Mystery Fun Fold card!


Cardstock 5 ½” x 4 ¼”
Cardstock 9 ¾” x 4 ¼”, scored at 3 ¼” & 6 ½”
*Different cardstock 2 ½” x ¾” (for sentiment)
DSP 4” x 5 ¼”,
*Coordinating DSP 1 ½” x 3” (to mat sentiment)
Basic White 3” x 4” (cut 2), 2 ¼” x ½”
Sentiment that will fit on the 2 ¼” x ½” piece
2-3 groups of embellishments
Twine or ribbon if desired 8-10”
 
 Watch the Facebook Live or the YouTube video to make this card with me.
 
 Spoiler Alert!!!
 .
.
.
.
.
.
.
.
.
.
.
.
.
.
.
.
.
.
.
.
.
.
.
.
.
.
.
.
.
.
.
 
 Here is the card that I demonstrated in the video. You'll have to watch the video to see the inside of the card. I got it ready to mail and realized I had not taken a photo of the inside first. But you will see it in the video.

I used Coastal Cabana cardstock for the folded section and Gray Granite for the base. The DSP is from the Nests of Winter selection. I also used the Winterly Tree Tops dies to cut the birds from the DSP.  The sentiments are from The Right Words stamp set on page 89 in the new annual catalog. The sentiment piece on this card is app. 3" x 1 1/2" and is matted with Gray Granite just 1/4" more so 3 1/4" x 1 3/4". You can size these pieces to fit the sentiment you've chosen. The card has another bird on the inside and another sentiment. The third piece of DSP forms the pocket for the gift card, money, scripture card...whatever you choose to use. Since this is a sympathy card, I chose to put a Bible verse on a card in the $ slot.  
  
This is my 2nd sample using this card layout.
 
For this card I used the Storybook Moments DSP which also includes a wonderful assortment of cardstock images. I used 3 of these on the front and another couple on the inside. My card base is Lost Lagoon and the folded section is Boho Blue. I blended a small amount of Pecan Pie on the bottom of the card front then stamped the rock wall in the Storybook Friends stampset with Secret Sea and a cloud from the retired Under the Moon stamp set. I mounted the cardstock pieces with dimensionals as well as my matted sentiment. 
.


Inside, I again blended some Pecan Pie ground at the bottom and adhered two of the pieces from the DSP. The inside sentiment comes from the retiring Citrus Blooms stamp set


The last sample I used was one made earlier from retired A Little Latte DSP. The base is Pool Party as is the folded section. I stamped and colored the mug then cut it with a die. I also stamped, colored and cut the spoon, made a small slit just inside the mug and slipped the spoon into it.


The inside mug was die cut from the DSP. I added the coffee splotches and coffee beans to fill some of the blank space. 


Now it's your turn to make this versatile fun fold. I'd love to see what you made. Post a photo here in the comments or go to my group page StampinDeDe's Doin's and Designs and add your photo to the Mystery Card album!  

Thanks for visiting my blog!! Please click Follow on the left!

Thursday, April 24, 2025

Paneled Fun Fold card

 Today's Facebook Live features a fun fold card that lets you use some of your DSP! I'm always looking for opportunities to use my DSP!
 
The cutting sizes that you will need for this fun fold are as follows:
Cardstock - card base  11" x 5 1/2", scored at 1 1/4", 5 1/2" & 9 1/4"
   cardstock for belly band 10" x 1"
 DSP
    Front & inside flap (smaller flap) cut 2  1" x 5 1/4"
    Larger folded front panel  1 1/2" x 5 1/4"
    Large front panel  3 1/2" x 5 1/4"
Basic White
    4" x 5 1/4" for inside
    scrap for punched or diecut shape 

This is the card that I demonstrated on the Facebook Live video and on YouTube. Be sure to watch the video for complete instructions to make this card.
 The Designer Series Paper I used was from the Country Woods collection. The background cardstock is Pool Party as is the belly band. The stamped & diecut image is from Loveliest Tree. The sentiment was also from Loveliest Tree. 


This card was made using DSP from the Woven Textures collection.The card base is Crumb Cake.  I stamped the coffee splotches on the front fold and coffee beans on the belly band from the retired A Latte Love stamp set. The coffee mug is from A Little Latte DSP.


 This card is made using one of my favorite DSP sets - Storybook Moments. The paper is beautiful and the collection also includes 2 sheets of pre-cut images that coordinate with the paper. I used these pre-cut images on the Spotlight on Nature circle - the wheelbarrow and the fruit and veggies. The card base and the belly band are Boho Blue cardstock. The Boho Blue twine is from the Bakers Twine 3 Color pack.


Another Designer Series Paper that also includes the pre-cut cardstock images is Wildflower Birthday. I mounted the DSP onto Soft Sea Foam base and mounted the pre-cut cake and florals onto an Everyday Details die-cut circle (retired). I also adhered a couple of the pre-cut images onto the front of the envelope. The birthday greeting is inside.


 The last sample I made is using Floral Impressions DSP on Old Olive cardstock. The stamped greenery and the little lady bugs are from the Mixed Floral bundle. The sentiment is from the retired So Sincere stamp set. The circle is cut using Stylish Shapes dies.
 
 
I really enjoyed using this funfold template and hope that you will give it a try! Be sure to watch the video either on YouTube or on my Facebook page.
 
And while you are here, please look to the left and click Follow! I really appreciate that!

Sunday, April 13, 2025

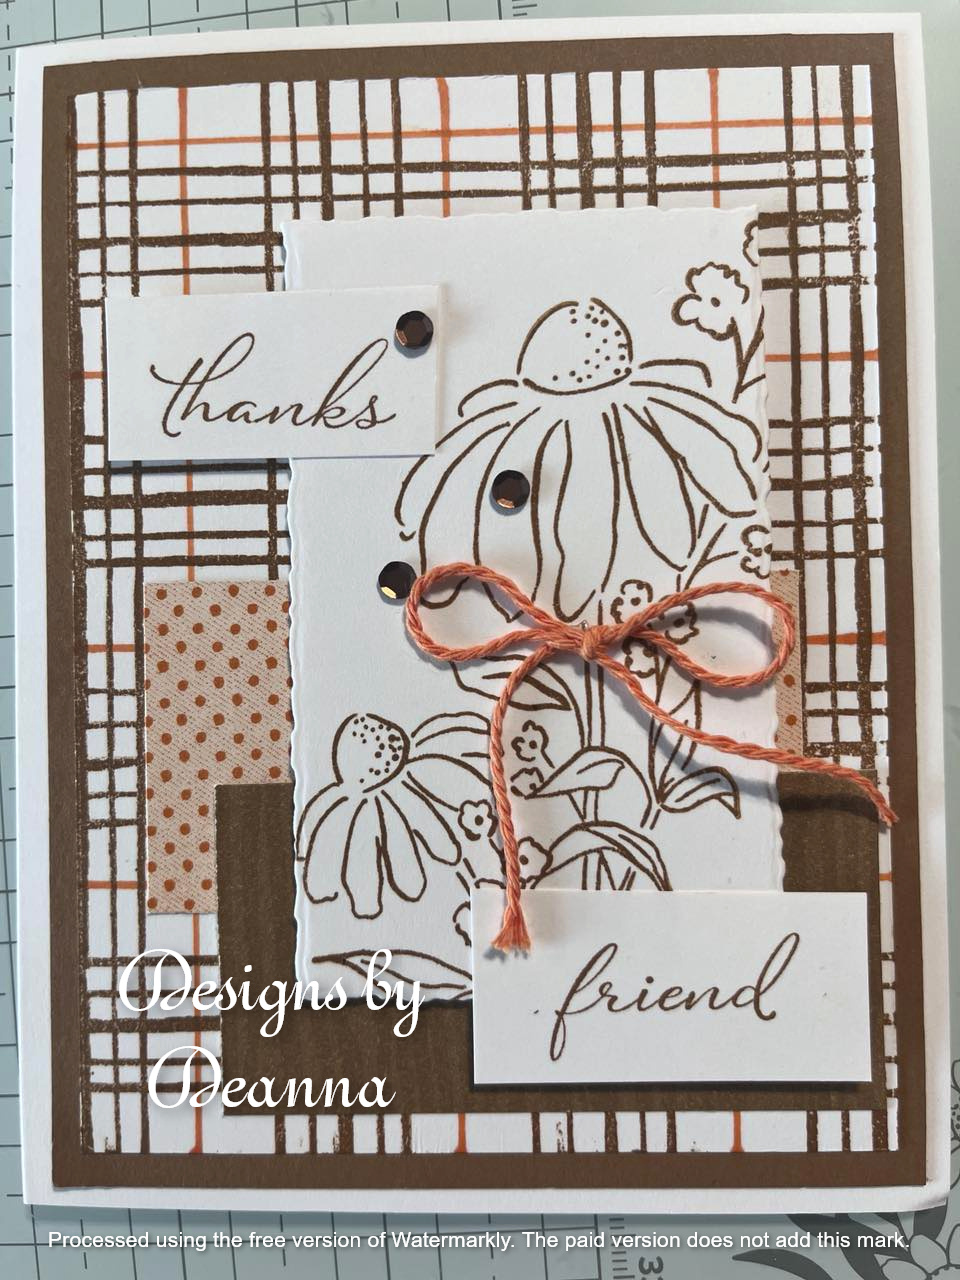
Sketched Plaid Tutorial


Here's a free tutorial just for you!


This card illustrates how to customize the Sketched Plaid die to coordinate with any color scheme.
 

Supplies: Basic White cardstock, Pecan Pie cardstock, To Market DSP, Sketched Plaid stamp, Mixed Floral coneflower stamp, Pecan Pie ink, Dark Pumpkin Pie Stampin’ Blend, Spotlight on Nature sentiments, Deckled Rectangle die, Three Twine Combo Pumpkin Pie, Neutrals Adhesive Backed Sequins, small ruler

Cut Sizes: Basic White cardbase 8 ½” x 5 ½” scored at 4 ¼”, 5” x 3 ¾”, 3 ½’ X 2 1/8’, scrap for sentiment; Pecan Pie 4” x 5 ¼”; DSP (2 patterns) 1 ½” x 3” each; twine 8”; sequins 3 brown


Instructions:

*Fold & burnish cardbase

*Stamp 5” x 3 ¾” Basic White with Sketched Plaid stamp, inked with Pecan Pie.( I find it easier with a large stamp like this to carefully lay my white cardstock onto the inked stamp, place a piece of scratch paper over this then rub around on the image with an acrylic block or your fingers until you feel you have pressed all areas of the stamp. Remove scratch paper then carefully lift the cardstock from the stamp.)

*Use Pumpkin Pie Stampin' Blend to add additional lines to Sketched Plaid pattern using a ruler. (I added in both directions for this one)

*Stamp sentiment with Pecan Pie ink. Cut sentiment to desired size

*Stamp flower image onto Basic White and trim with Deckled Rectangle die

*Adhere plaid stamped Basic White to Pecan Pie cardstock

*Adhere two 1 ½” x 3” pieces DSP to card front as shown

*Adhere stamped flower image onto card front with dimensionals

*Adhere sentiment(s) with dimensionals

*Adhere Sketched Plaid cardfront to cardbase.

*Tie bow with twine and add to flower stem

*Add sequins to card

 Before you leave my blog, please click 'FOLLOW' so you'll be notified of each new post. Thanks for visiting!