Saturday, August 24, 2024

9 Rectangles on a Card

 We're always looking for ways to use our DSP (patterned paper), right? So this sketch affords us another way to use our beautiful Designer Series Paper!

The measurements for this card are:

    card base  8 1/2" x 5 1/2", scored at 4 1/4"

    Basic White card front  5 1/4" x 4"

    DSP  cut 9 rectangles 1 5/8" x 1 1/4" each

    card stock scraps for sentiment label and embellishment images

    ribbon and/or gems if desired

These are the samples that I showed on my Facebook Live or on YouTube.


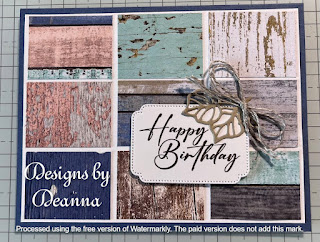
I really needed some masculine birthday cards so that was the motivation for this one. I used Country Woods DSP. My card base is Misty Moonlight cardstock and the rectangles are mounted on a           4" x 5 1/4" piece of Basic White cardstock. I used a scrap of Basic White to cut my sentiment piece with an Unbounded Love die. I cut the leaves from Crumb Cake also with an Unbounded Love die and finished off the card with a Linen Thread bow.


This sample uses Wildly Flowering DSP, Wild Wheat card base and Basic White for the mat and the sentiment piece. The sentiment piece is cut using a Spotlight on Nature die. I used Thoughtful Wishes leave dies with Moody Mauve cardstock. Sequins and a Moody Mauve bow finished off the card.


This 3rd sample uses Unbounded Love DSP mounted on Basic White and on Peach Pie card base. The sentiment piece uses Shy Shamrock and Petunia Pop cardstock cut with Unbounded Love dies. The sentiment from Unbounded Love is stamped on Basic White.


This card is the one that I demonstrated on the Facebook Live or on YouTube. I used a Designer Series Paper that is not available for purchase but I really wanted to give this one a try. It is Countryside Rose, which was a reward for a Stampin' Up challenge for demonstrators.  I love the colors in this one. The cardbase is Melon Mambo as is the outer part of the label. The inside of the label is Petal Pink and the sentiment is from Spotlight on Nature. I use Petal Pink ribbon and In Color Petunia Pop gems. Be sure to watch the video to see the assembly of this simple card.

Thank you for visiting my blog. Please click FOLLOW and you'll be notified each time I have a new post.

Saturday, August 17, 2024

WV Accordion Funfold Stampin' Thursday

This funfold is an easy one to make - just requires some scoring, folding, and cutting DSP! 

Here are the measurements needed for this card:

The base should be a piece of card stock that coordinates with the DSP that you choose. The 2nd piece of card stock will be from the remaining piece from your card base.


 The YouTube video or the Facebook Live make this card easy to put together. 

Once you've scored and folded the card base, you can cut your DSP. If you're using a 6"x6" DSP, you can cut it down to 5 1/4" first then cut your four 1 1/2" x 5 1/4" pieces, keeping them in the order that you cut so they'll flow from one to the other on your card. Cut the 2nd piece of DSP from the same pattern or use a different coordinating one.

Decide whether you want to use a full 3 3/4" x 5 1/4" Basic White or just the 2 3/4" x 2 3/4" piece. 

Do whatever stamping you want on the 2 3/4" x 2 3/4" Basic White and adhere to the left side of the folded 3" x 6" piece of cardstock. Adhere the 2nd piece of DSP to the other end of the 3" x 6" piece.

Here is the template to show where to place pieces.

Once the DSP strips are in place. put a strip of Tear N Tape or Stampin' Seal + on both ends of the back side of the 3" x 6". Close the card, positioning this piece on the front and back piece of DSP so that it doesn't extend beyond the edge of the card base.

Now your card is ready for any embellishments you may want to add to the front to finish it off.

Here are some samples of this funfold card as well as the one the is demonstrated on the video.


This one uses Daffodil Delight cardstock and Mediterranean Blooms DSP. The image is diecut from the DSP. The ribbon is Lemon Lolly.


This card is the one that I demonstrated during the Facebook Live. It uses Boho Blue card base and Thoughtful Journey DSP. The die-cuts were using Thoughtful Wishes dies and Mossy Meadow cardstock. The ribbon is Petunia Pop.


This sample uses Gorgeous Grape card stock and Perennial Lavender DSP. The stamps and dies are from the Painted  Lavender bundle.


This sample uses the 'soon to be available' Nests of Winter DSP and Winterly Treetops stamps and dies. The card base is Gray Granite. The front Basic White piece is embossed with the Fern 3D embossing folder. The bird and stems were stamped, diecut and colored using Boho Blue and Gray Granite Stamping Blends. Gray Bakers Twine is used and the sentiment is from Unbounded Love.


This card has Pretty In Pink card base and the DSP is Unbounded Beauty. The butterfly is from the Paper Butterfly Accents and is colored using a blending brush with Pretty in Pink and Petunia Pop inks. The flower image is from Spotlight on Nature and is stamped once on the card front and again on a scrap piece of Basic White cardstock. The images on the scrap are colored with Pretty in Pink and Petunia Pop Stamping Blends, are fussycut and mounted on the cardfront with dimensionals. The leaves are colored with Shy Shamrock Stamping Blend and the small bloom is colored with Pretty in Pink. 2024-2026 In Color Shimmer Gems finish off the front of the card.


Give this fun fold a try and see if you don't love it as much as I do!! Thanks for visiting my blog. Please click Follow and enter your e-mail. You'll be notified each time I post something new!

Tuesday, August 6, 2024

Die-ing to Know Spotlight on Nature

 The Spotlight on Nature bundle features some unique circle dies as well as some beautiful stamps. So we are going to explore different ways to use this bundle.


There are 12 circle dies - 2 sets of 6 each. The dies include 3 different patterns and these patterns are repeated in each set. One set starts with the flower pattern, repeating the 3 patterns twice while the 2nd set starts with the ridged pattern, repeating the 3 patterns twice.

So there are multiple ways in which these dies can be used. I only touched on a few of the creative ways to use them.

The stamps offer delicate images which lend themselves well to coloring with Stampin' Blends if you desire or can easily stand alone.

These are the samples that I shared using the stamps and dies in various ways...


This last card is the one that I demonstrated. The cardbase is Blueberry Bushel 8 1/2" x 5 1/2" scored at 4 1/4". The DSP is from Country Woods cut at 4" x 5 1/4" and adhered onto the cardbase. The frame is cut from Thoughtful Journey DSP. I chose a piece of DSP that included the Petunia Pop/Fresh Fresia tones in it. I wanted to include those in my frame. I then selected the largest ridged die and the next largest die. I positioned these, one inside the other, onto the DSP to include the section that I wanted and ran it through the Cut & Emboss. You are left with two use-able pieces - the frame and an inside piece that you can set aside for another project. Next I stamped my flower image in Blueberry Bushel onto Basic White. I chose the 2nd largest die with the dashes to cut around the image, creating my centerpiece. I stamped the butterfly in Petunia Pop and the sentiments in Blueberry Bushel. After fussy-cutting the butterfly and trimming around the sentiments, the card is ready to be assembled. The frame is mounted with mini-dimensionals around the Basic White image piece. The butterfly and sentiments are also adhered with dimensionals. Finish the card with Irridescent Pearls placed on the butterfly. 

 To see this bundle used, be sure to watch the YouTube video. I hope you are inspired to give this bundle a try!


Thursday, August 1, 2024

TO MARKET Card Tutorial

 Supplies: Colored Cardstock 4 ¼” x 11” scored 5 ½”, scrap (I used Blackberry Bliss); different colored cardstock 4” x 5 ½”, 2 ½” x 2 ½”, scrap (I used Peach Pie); DSP 3 ¾” x 5” (I used To Market 12 x 12); Basic White cardstock 2 ¼” x 2 ¼”, 4” x 5 ¼”, scrap; stamps, images, sentiments, ribbon, Embossing Folder

*Adhere the colored cardstock layer that measures 4” x 5 1/4” to the card base with adhesive.

*Add the DSP layer that measures 3 ¾” x 5” to the card front with adhesive.

*Emboss the 2 ¼” x 2 ¼” Basic White layer with embossing folder.

*Adhere the embossed Basic White layer to the colored cardstock layer that measures 2 ½” x 2 ½”, using liquid glue for best results.

*Add both layers to the top of the cardfront with dimensionals.

*Stamp sentiment on Basic White scrap (I chose 3 words from Choose Happy, stamped them, trimmed each one separately)

*Mat your sentiment with a colored cardstock scrap.

*Add sentiment to the cardfront toward the bottom with dimensionals.

*Adhere an image that you have stamped, diecut, fussycut, etc. to the white embossed square. (I fussy cut an image from the DSP)

*Add ribbon, gems, etc. to complete your card front.

*Add the Basic White 4” x 5 ¼” to the inside. I added a ¼” piece of DSP to trim.